
Configuring a Ubiquiti EdgeRouter X for WiFi and cell internet on your boat
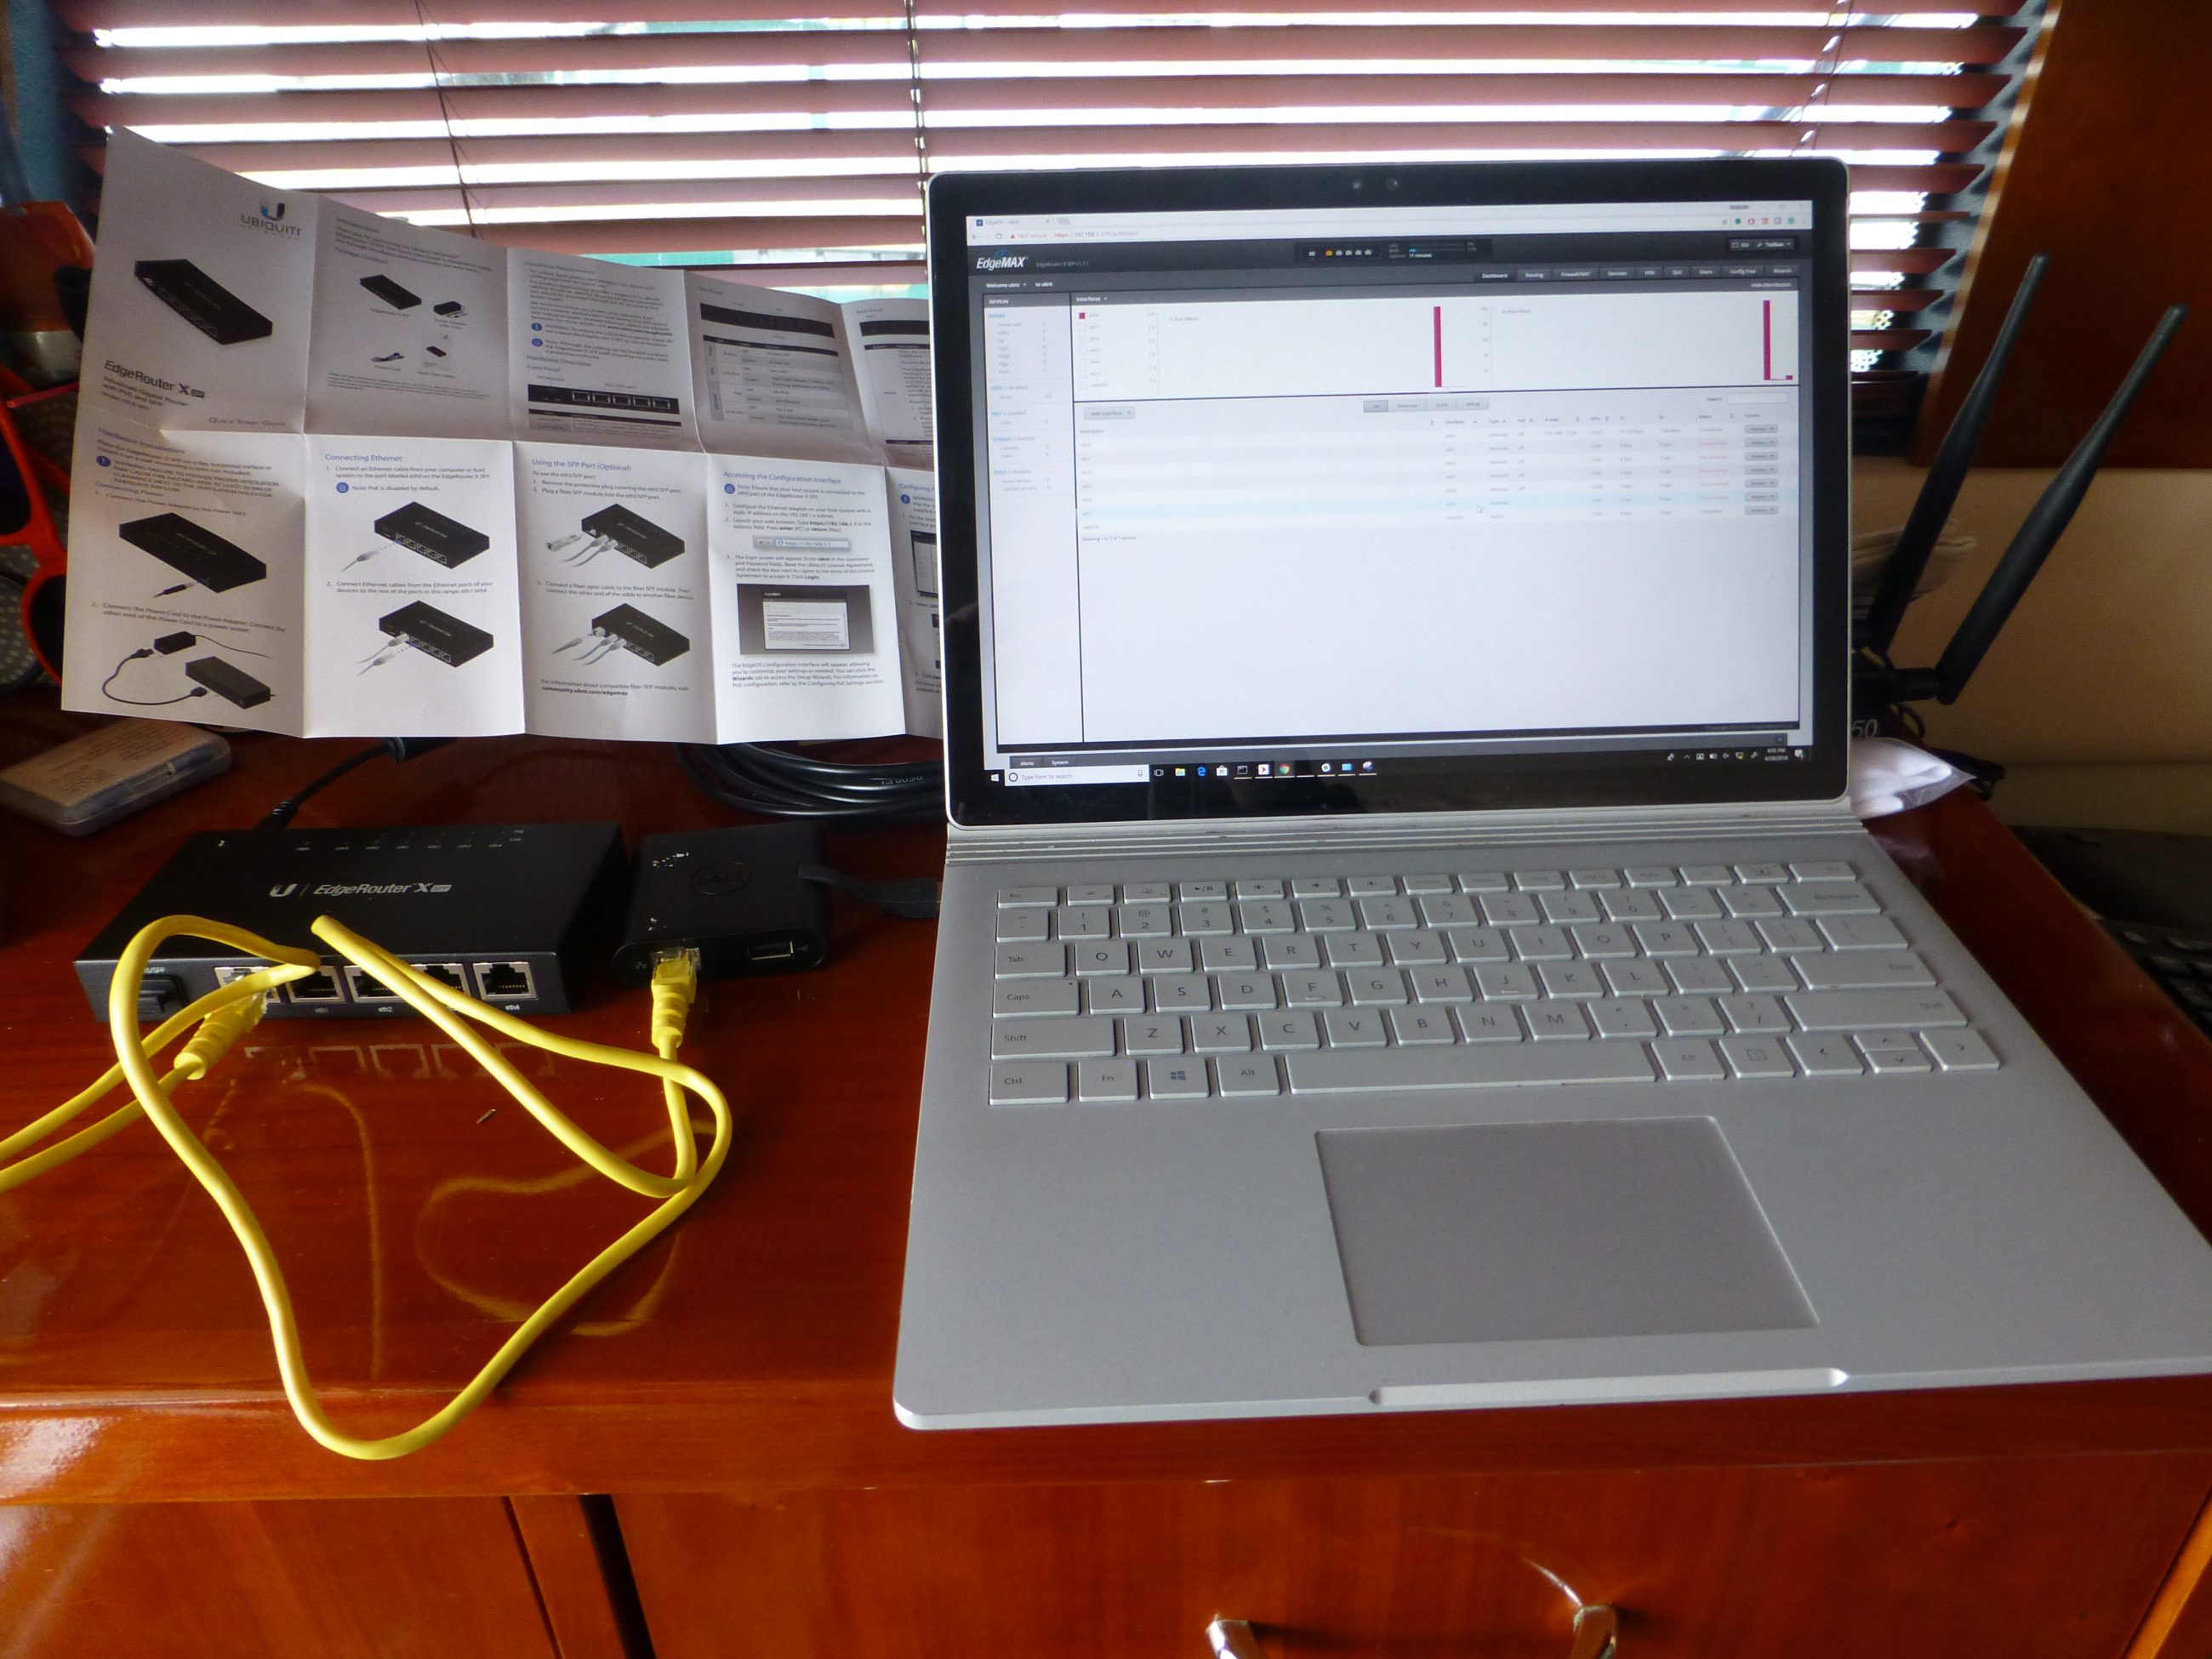
My workstation for the configuration
In my feature Marine internet, a connected year on the water, I referenced a Ubiquiti EdgeRouter as the “heart of our boat network.” It manages multiple WiFi and cellular internet connections to multiple computers, tablets, etc. around the boat, and is remarkably capable for its cost. However, I also described configuring the EdgeRouter as not for the faint of the heart, which drew many requests for more detail. So this follow-up entry is the step-by-step guide to setting up this specific router on your boat, and fortunately it turned out to be easier than I remembered.
First up, I ordered a shiny new EdgeRouter X SFP, easy to do for $69, and dove into configuring. I picked the EdgeRouter X SFP from the various EdgeRouter models because it supports power over ethernet (POE) on all five ports. I figured it would take a couple of hours to document all the steps involved, but a pleasant surprise was a small blurb buried in the quickstart guide (PDF) saying, “You can click the Wizards tab to access the Setup Wizards.” While I’m not sure if these were available the last time I configured this router model, I’m pleased to say a wizard worked perfectly, though there are still more steps required…
Getting Connected
Out of the box, the EdgeRouter comes with a very minimal configuration. For instance, it comes with DHCP turned off, so it won’t configure the IP address of your computer, and only one port (eth0) is configured with an IP address. As a result, it initially won’t route traffic for you or really do much of what you bought it for. The first thing you’ll need to do is manually configure your computer’s network interface to an IP address on the same subnet (this means the same IP address range the router is using), and in order to connect to the EdgeRouter you will need a computer with an Ethernet port. (A couple of years ago this was easy, but Ethernet ports are becoming increasingly rare on laptops. Mine doesn’t have one so I’ve used a USB Ethernet adapter.)
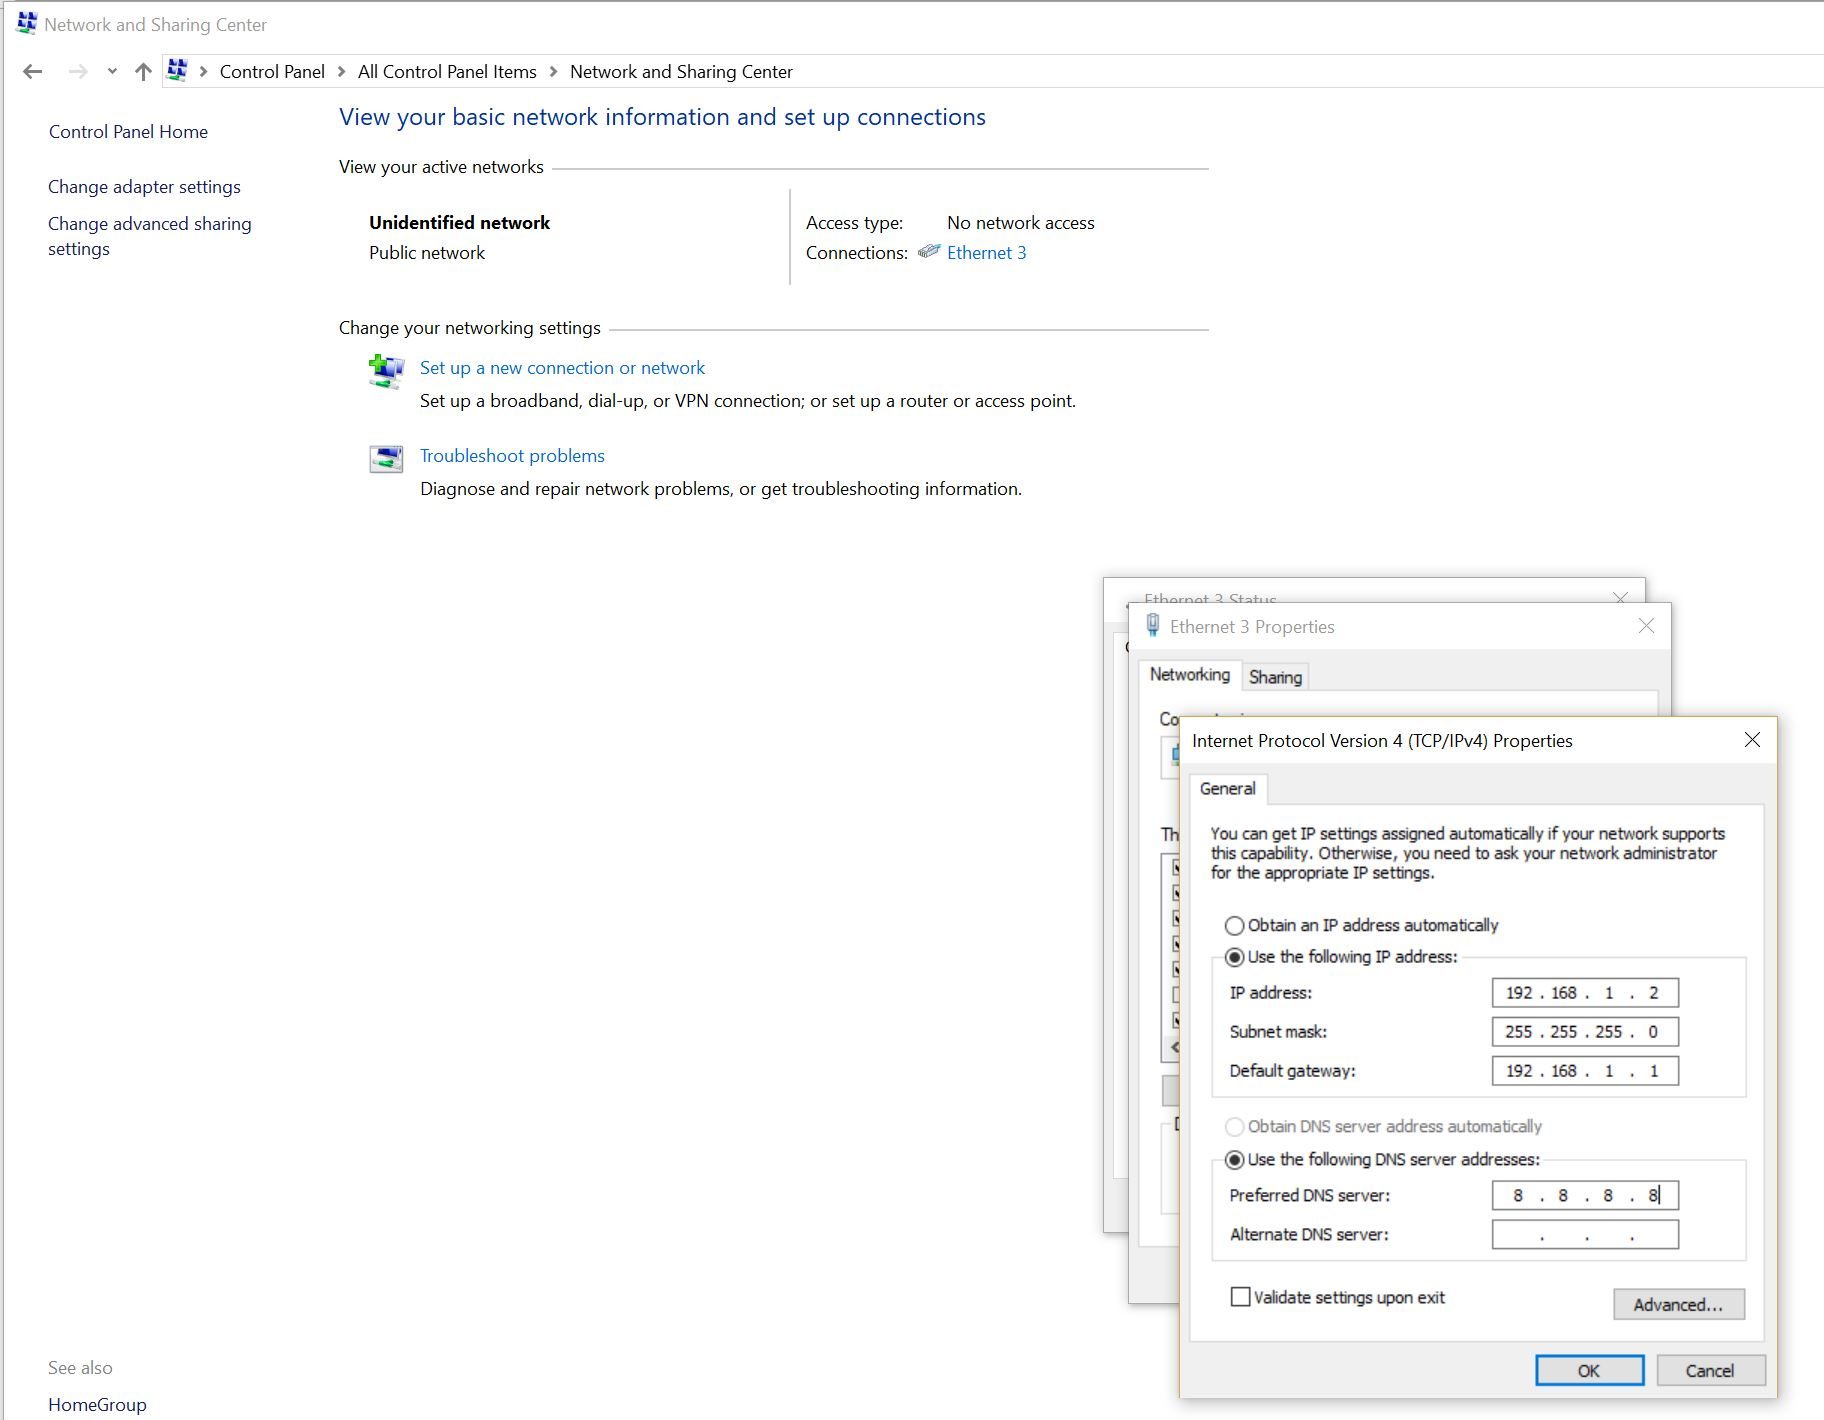
If you’re using a Windows computer to do the configuration, go to the Control Panel, then to Network and Sharing Center, and at the top right you should see your network adapter listed to the right of Connections. In the example above it’s listed as “Ethernet 3” and clicking on the adapter will bring up a dialog box that says ‘AdapterName Status’. Now click properties in the bottom left of that dialog. A new window will be opened titled “AdapterName Properties”; scroll down in the middle box of this window and find the line that says “Internet Protocol Version 4 (TCP/IPv4)”; and click on it followed by clicking the properties button on the bottom right. This will bring up a window titled “Internet Protocol Version 4 (TCP/IPv4) Properties”. By default, the EdgeRouter will come configured with an IP address of 192.168.1.1. I’ve configured the IP address of my computer to be 192.168.1.2. The subnet mask is set to 255.255.255.0, default gateway of 192.168.1.1 (the IP of the router), and I’ve set the DNS Server to be 8.8.8.8, Google’s public DNS IP.
Now is a good time to make sure you have an Ethernet cable going from ETH0 on the router to your computer’s Ethernet port.
Beginning Configuration

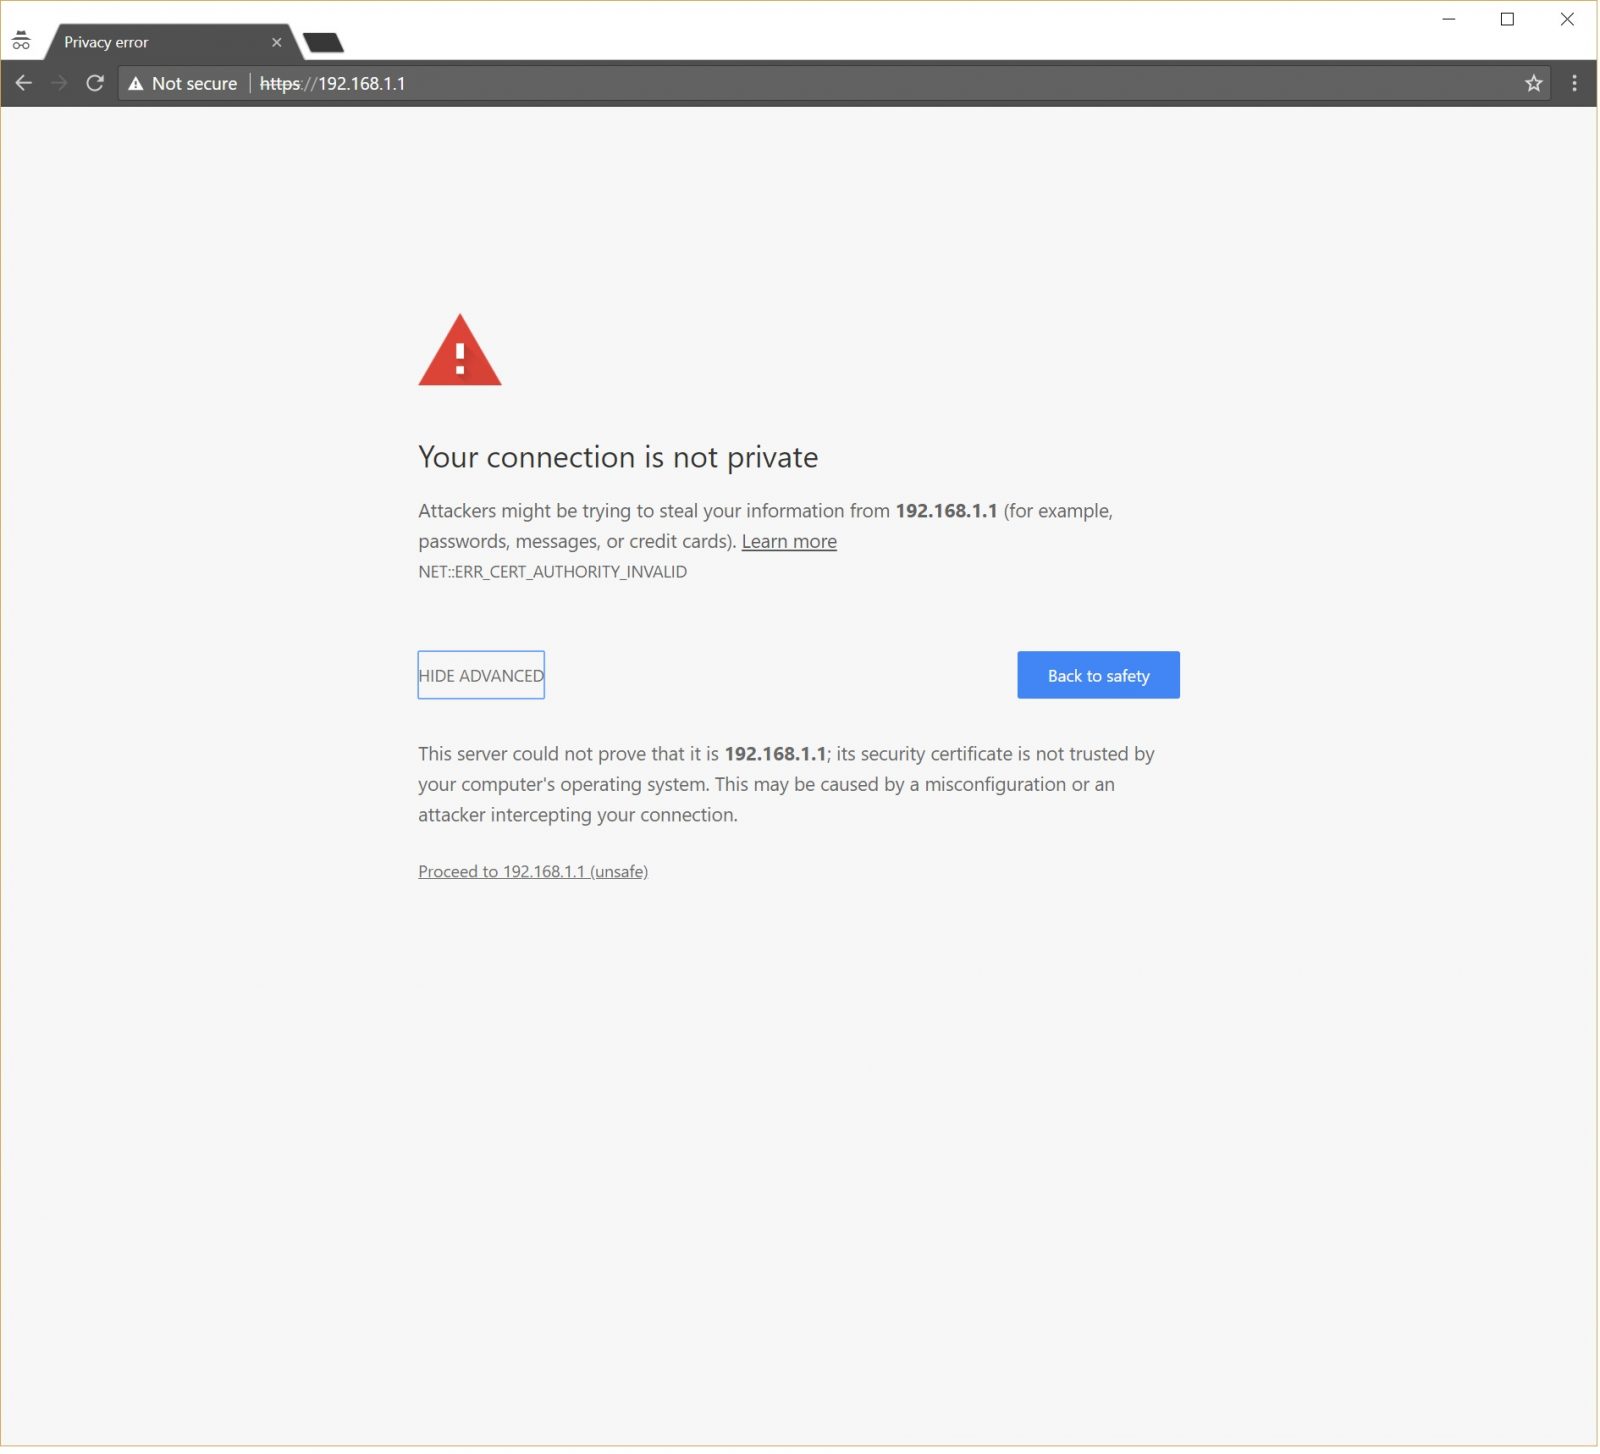
With the physical connection made and the Ethernet adapter on your computer configured, it’s time to start the task of configuring the router. You will need to fire up a web browser and point the browser at 192.168.1.1. When you do, you will see the screen above: A dire looking warning about your connection not being private. This is generated because the EdgeRouter ships with an unsigned security certificate, but there isn’t a security concern given that the device is only accessed from your private network. (If the warning and clickthrough bother you, a properly signed certificate can be installed.) In order to get past the warning you will need to click the ‘Advanced’ link on the bottom left of the screen then click ‘Proceed to 192.168.1.1 (unsafe)’ to proceed to the user interface.
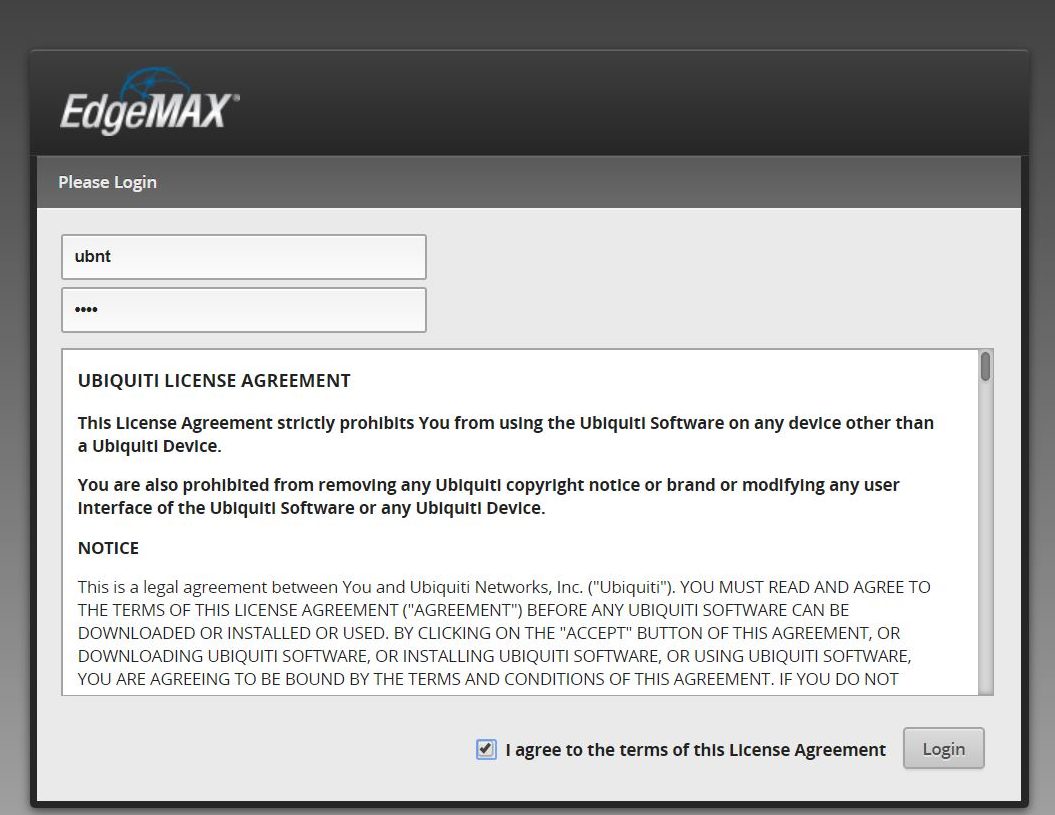
Now you will be greeted with a login prompt and license agreement to accept. Type the default username and password, ‘ubnt’ and ‘ubnt’ and click the “I agree to the terms of this Licensing Agreement” checkbox, and then press the ‘Login’ button.
Running the Wizard
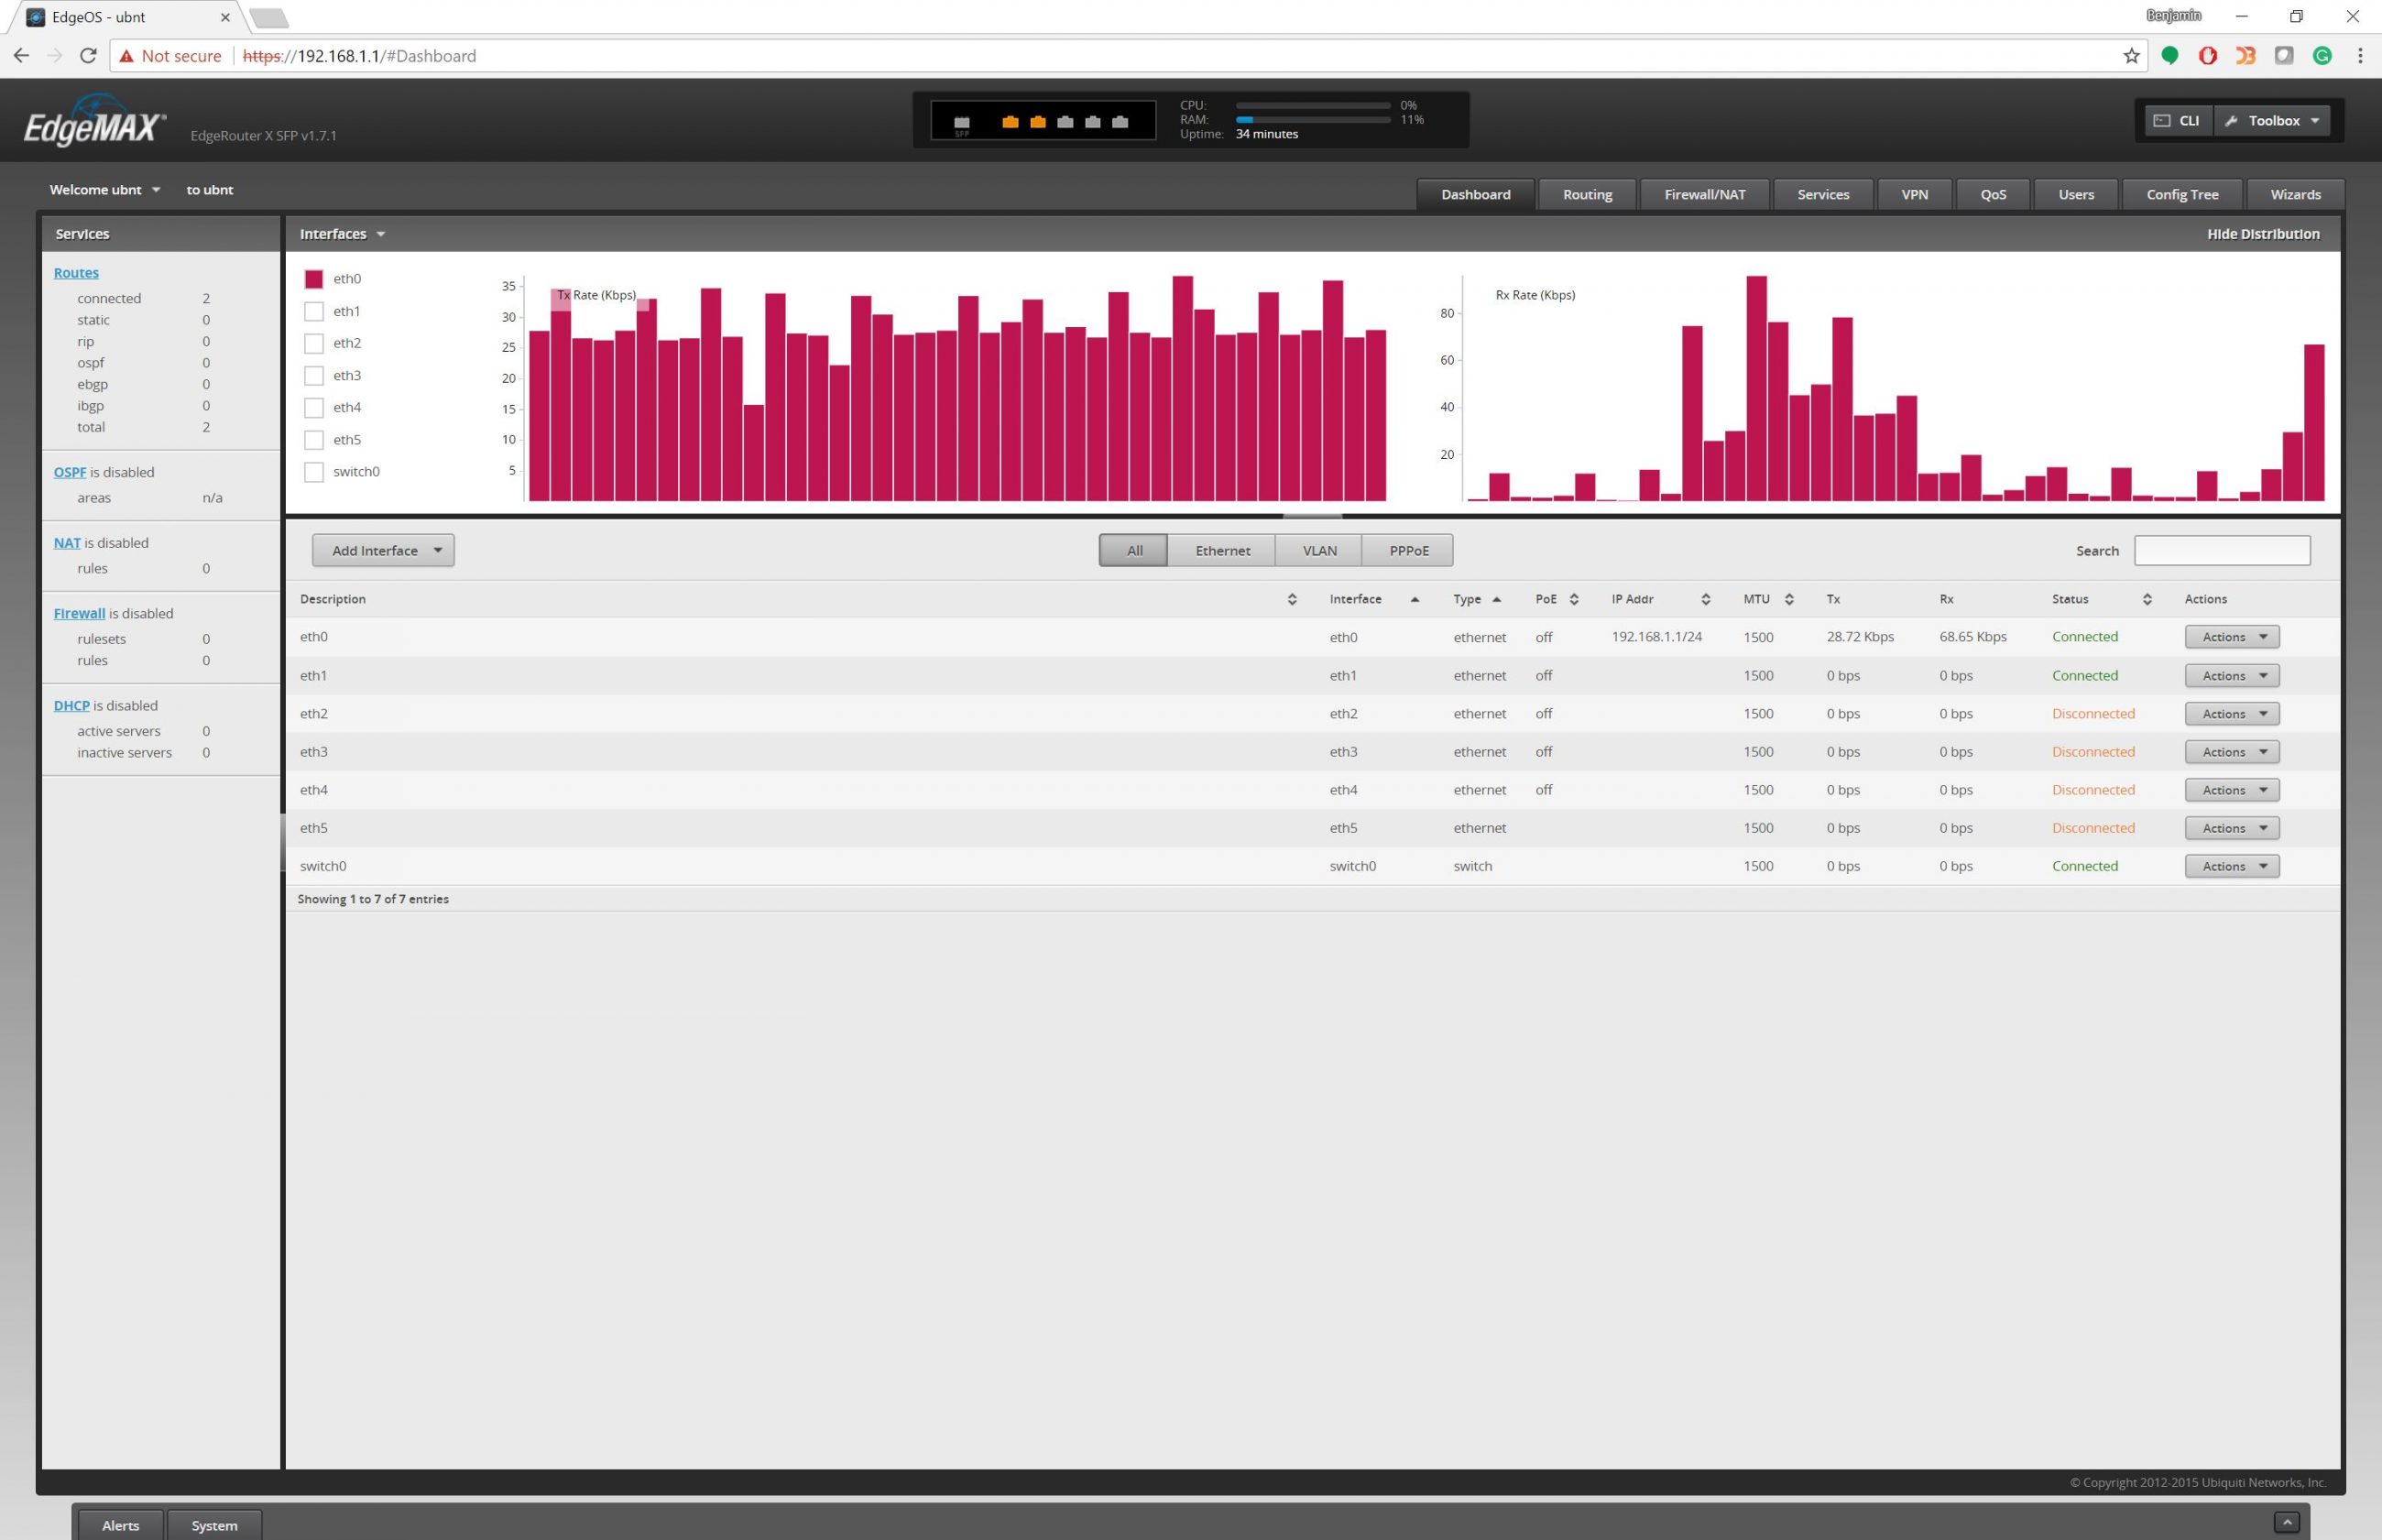
Now you’re logged in and looking at the EdgeMax dashboard. Because the router isn’t really configured yet it will just show a tiny trickle of traffic between your computer and the router. We now want to perform one of the configuration wizards in order to make the router route traffic. To get started with a wizard click the ‘Wizards’ button in the top right corner of the dashboard.
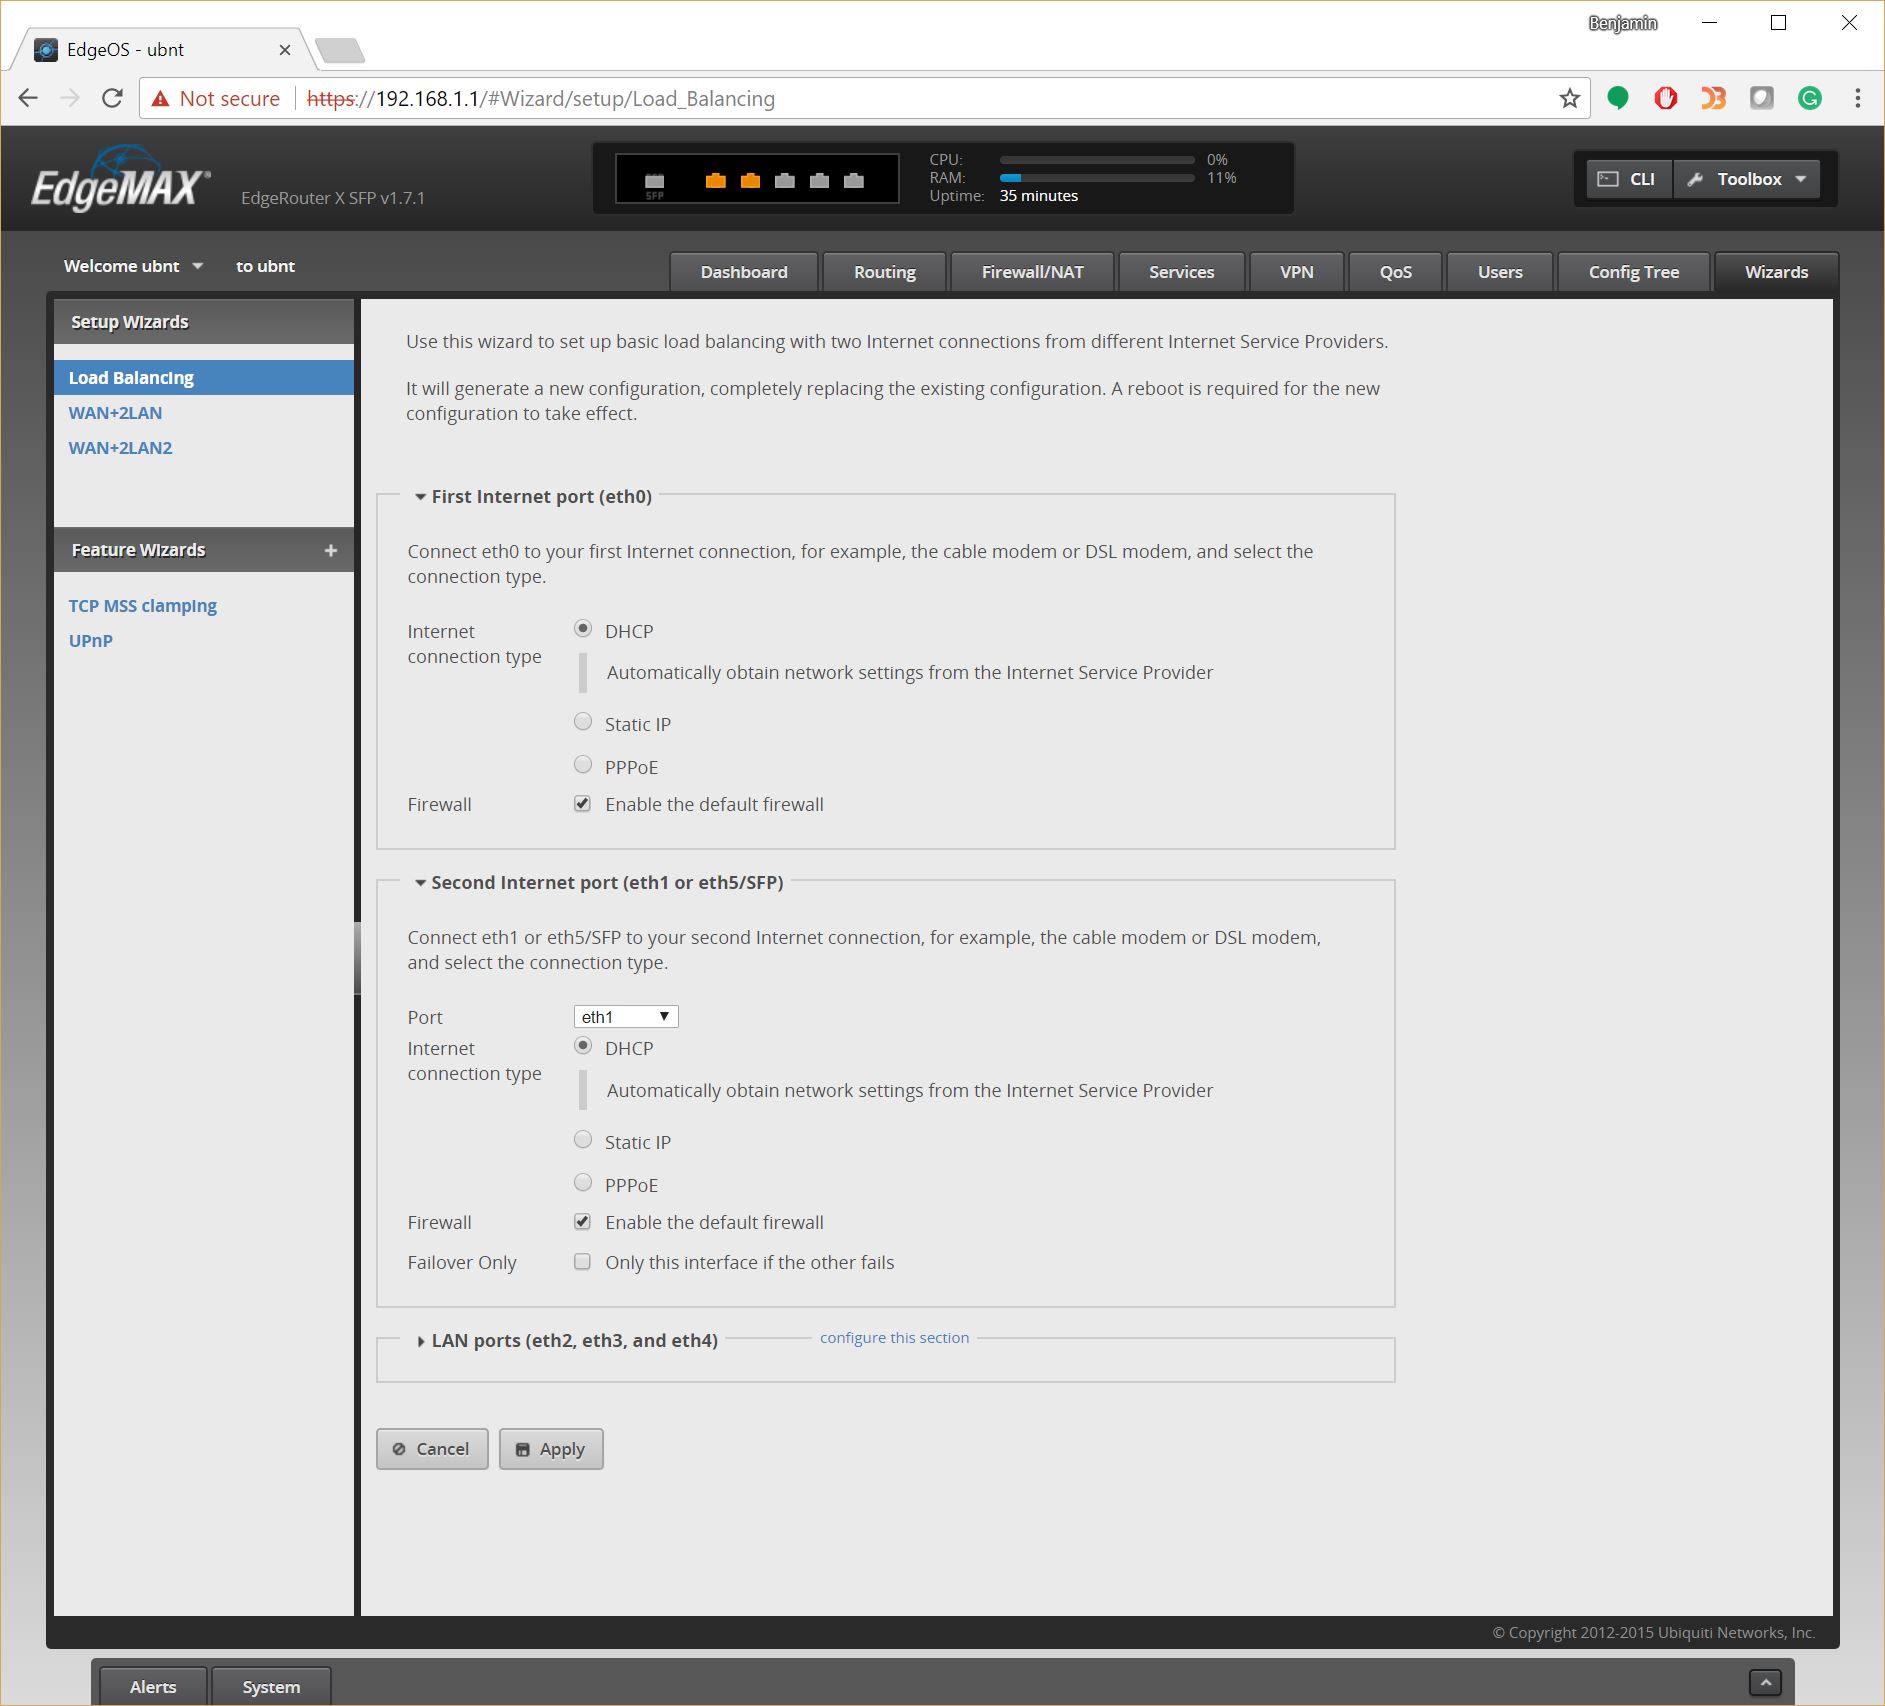
This will bring up the screen above. Assuming your router comes with version 1.71 installed, as mine did, you’ll have three choices: Load Balancing, WAN+2LAN and WAN+2LAN2. The first two are the relevant options for the vast majority of boat scenarios. Load Balancing will take two incoming internet connections — like a WiFi marina connection and a cell data source — and try to use both connections. If one isn’t working the router will automatically switch to using only the working connection. WAN+2LAN will configure the router in the most common configuration seen with home routers, where there’s just one WAN (Wide Area Network, generally meaning the internet) port and the remaining ports are configured as LAN (Local Area Network) ports. Once you’ve selected which wizard to run there’s very little to do; the default settings are all fine, so press the ‘Apply’ button on the bottom of the page.

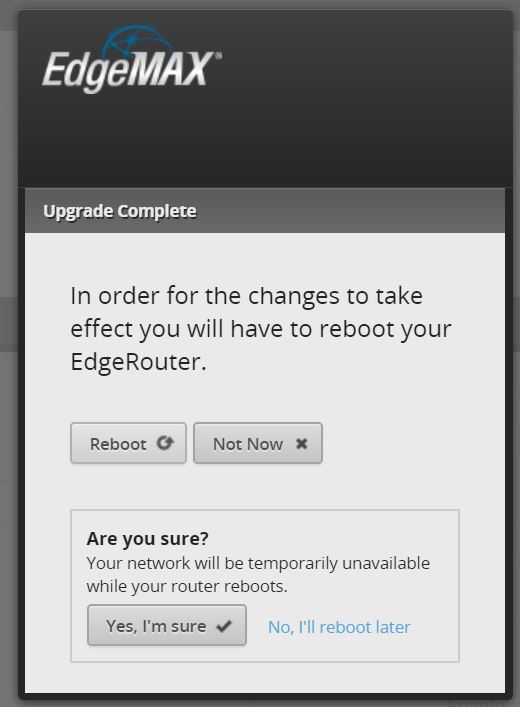
You’re then presented with a reboot dialog and confirmation screen. Press reboot, then tell the router you’re sure. It will reboot, which takes about two minutes, and when it comes back up, the EdgeRouter is ready to route traffic.
Post Wizard Configuration
While the router is rebooting is a good time to change your cabling around. In order to setup your router, you had your computer plugged into the port labeled ETH0. Now that we’ve configured the router for Load Balancing, the ports are setup with ETH0 being dedicated to internet connection 1 and ETH1 dedicated to internet connection 2. So, your LAN ports are ETH2-4. This means you should plug whatever devices are supplying internet connectivity, maybe a WiFi bridge or 4g modem, into ETH0 and ETH1 and plug your computer into ETH2. Once the router has rebooted you will log back in, still with ubnt/ubnt, and be presented with the dashboard. As can be seen in the picture above the wizard has named the first two ports as Internet – WAN and WAN2 and the rest of the ports as local.
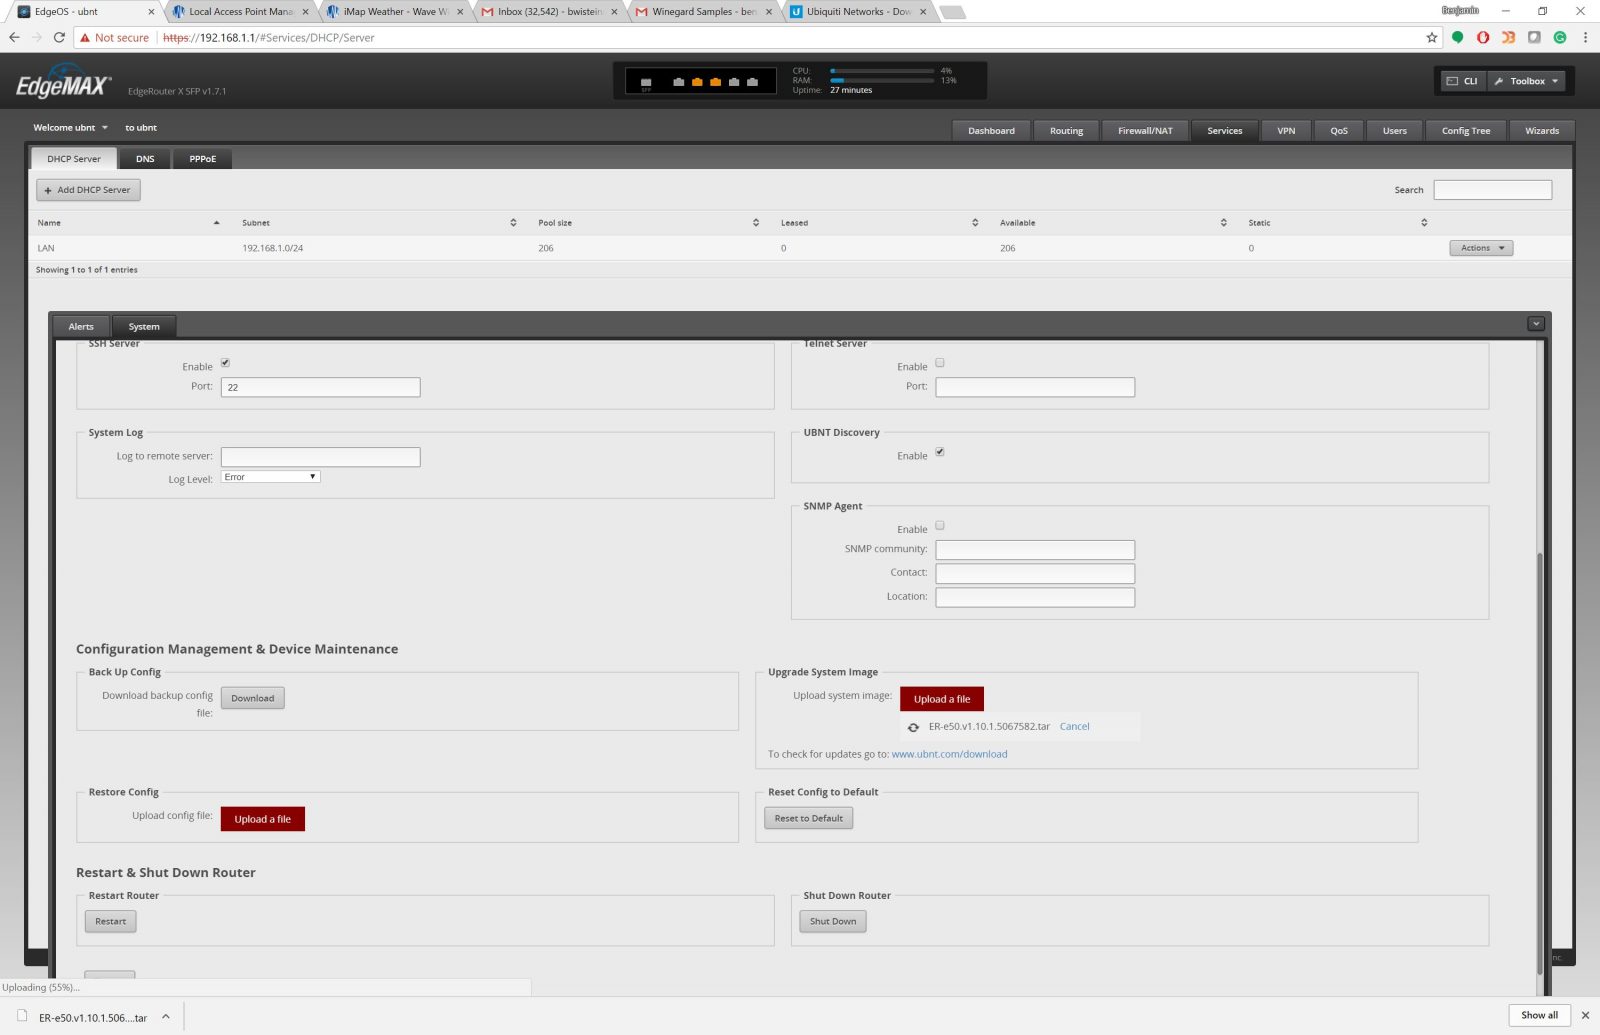
Every EdgeRouter I’ve opened comes with a pretty old version of the firmware installed; this one was no exception. With version 1.10 available, it came with 1.7.1 installed, which doesn’t support one of my favorite features, traffic analysis. So, you’ll want to head over to Ubiquiti’s firmware download website and download the most recent firmware. Now you’ll press the system button on the bottom towards the left of the dashboard. That will bring up the system configuration options for the EdgeRouter. About three-quarters of the way down on the right side there’s an option to upload a file to the router. Click the red ‘Upload a File’ button and select the file you just downloaded. It will then be uploaded to the router and verified. Once it’s applied you’ll be prompted to reboot the router so it can use the update.
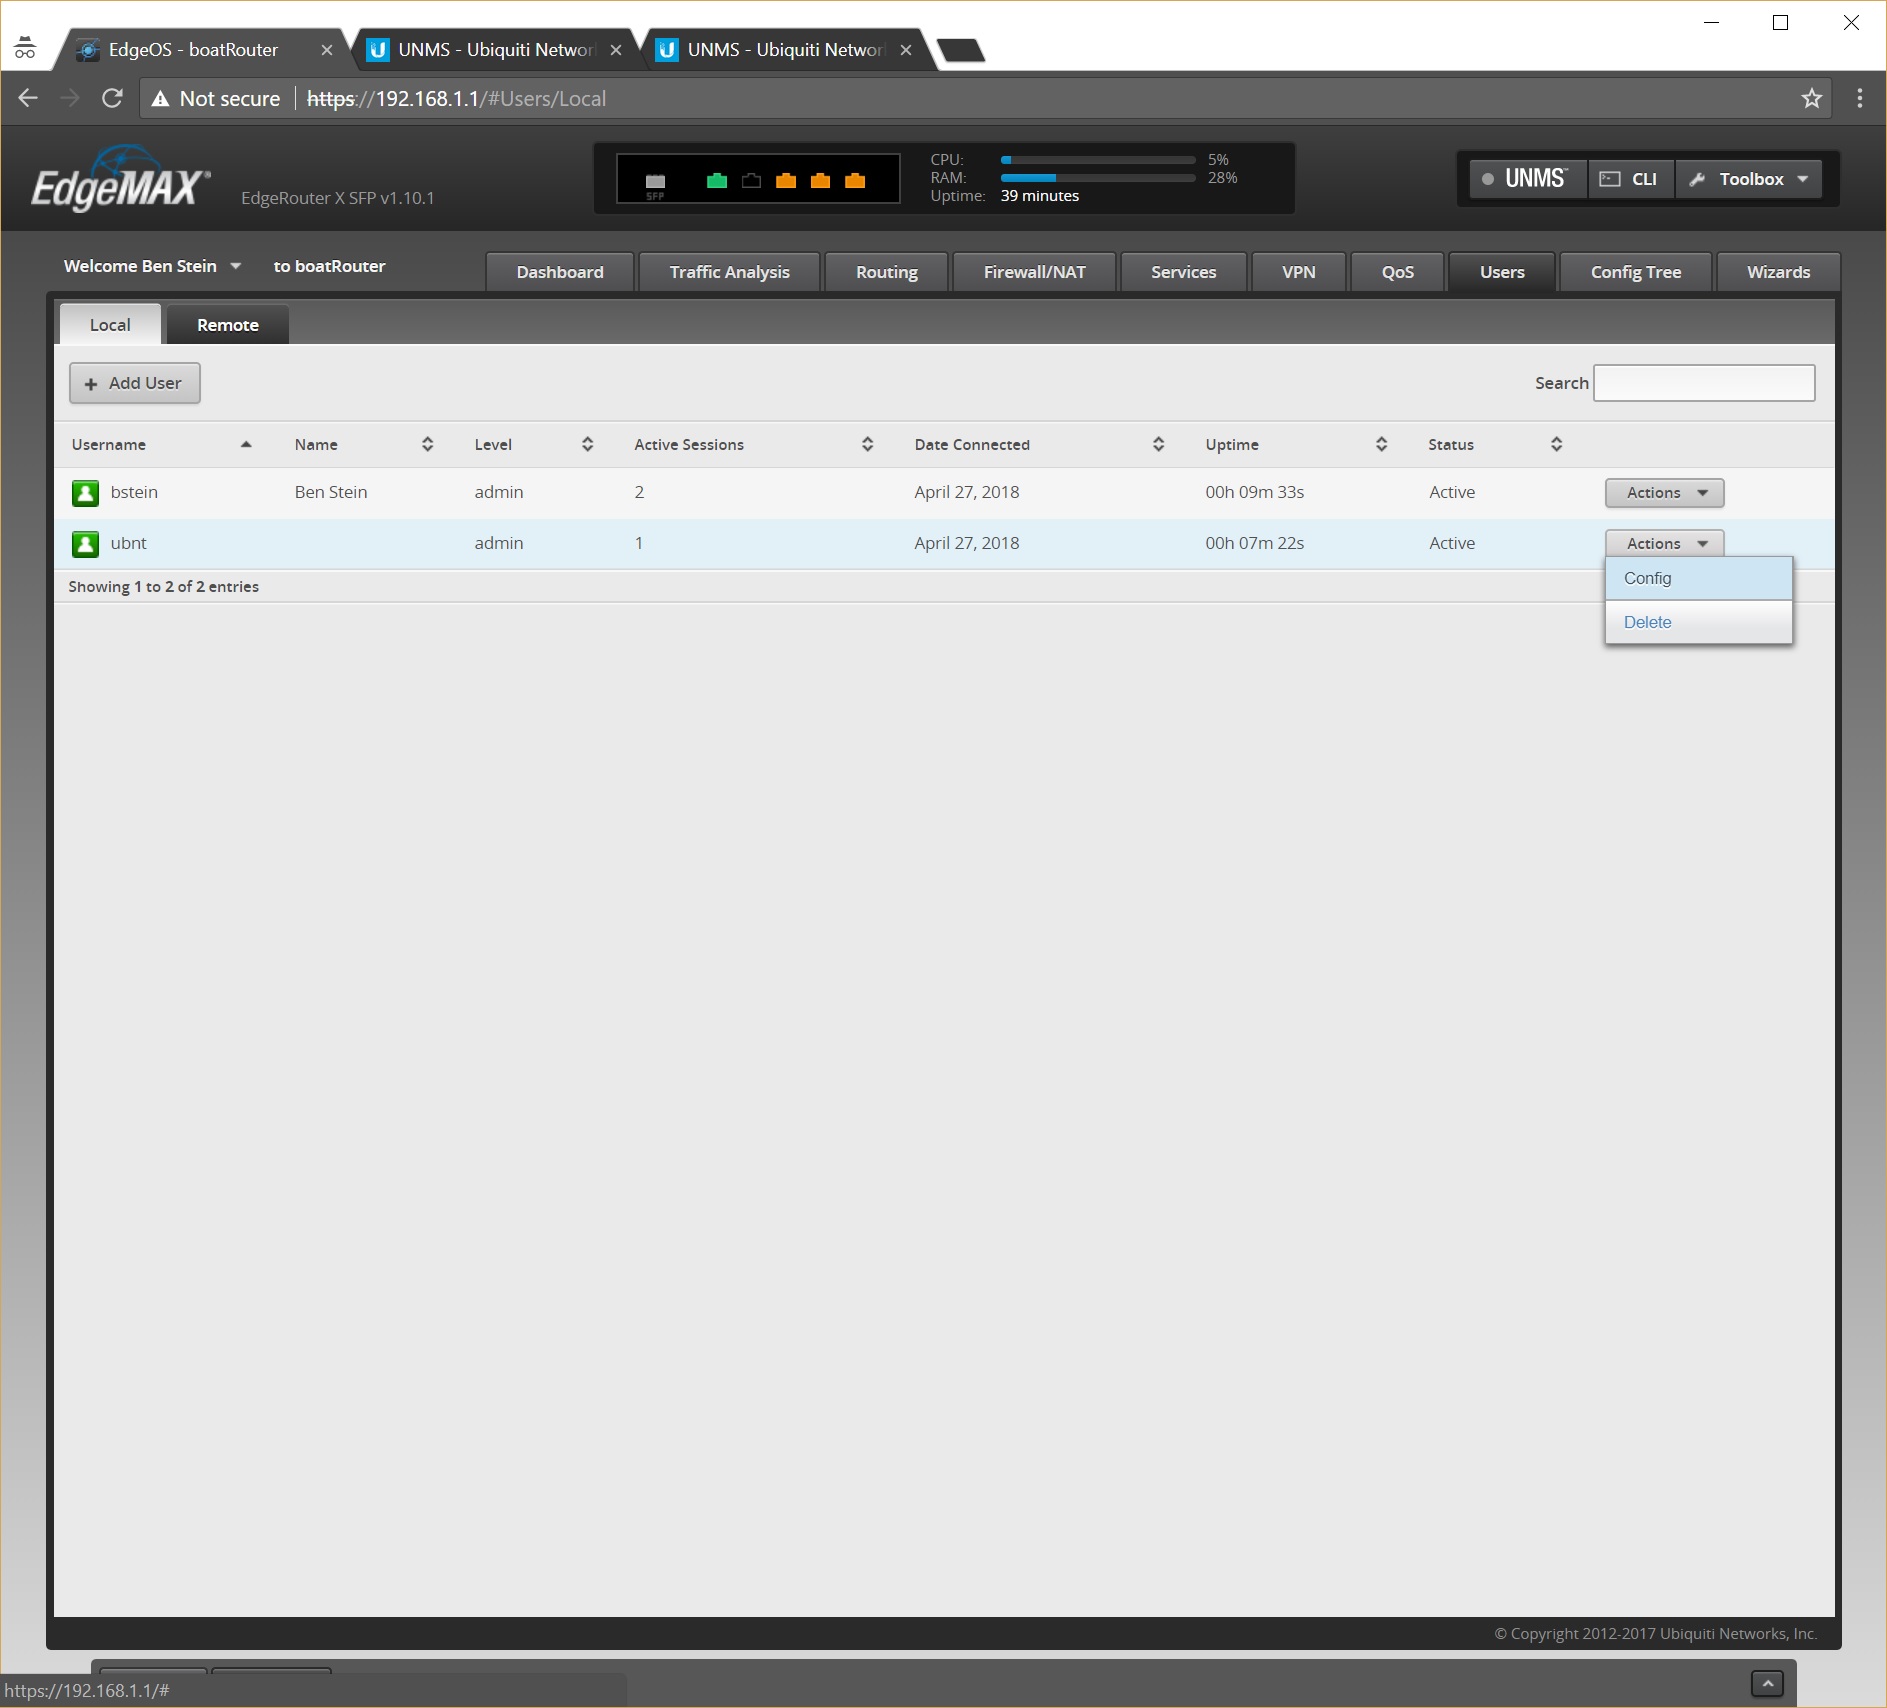
Once that’s done, the router will reboot and you will once again be presented with its login screen. Provide the same credentials, ubnt/ubnt, and return to the dashboard. Now is a good time to change the administrative credentials for the router. To do that select the ‘Users’ tab, the third tab from the right, and then select Config on the ‘ubnt’ user. It’s a good idea to change the password for the ubnt user. If you’d like to add another user with an easier to remember username you can do that by clicking ‘+ Add User’ on the top left of the page.
Getting Acquainted

Now that you’ve got the system up and running, it’s time to explore and get to know EdgeOS, the operating system run by EdgeRouters. When you first log in, you’re greeted with the dashboard you’ve seen above in several screenshots. This dashboard features two main graphs: In the left it displays the amount of upstream traffic, shown as Tx for transmit, flowing through each interface, and on the right the amount of downstream traffic, shown as Rx for receive.
It’s important to realize that for your internet connections upstream equals uploading and downstream equals downloading. For ports on your LAN it’s reversed. If you’re downloading something that traffic will be received (Rx) by the WAN port on your router and then transmitted (Tx) to the LAN port in order to be delivered to your computer. This screen is a great place to go when you’re wondering if your internet connection is healthy.
If your internet connection feels slow, fire up your web browser and point it at the IP of your router. When you log in, check how much traffic is flowing through the router. If you find there’s very little traffic flowing through the router, for example, less than 1 megabit, then it’s time to investigate the health of the incoming internet connection. If you find there’s 20mbps of traffic flowing it’s unlikely the problem is with the internet connection and more likely something on your network is consuming all the bandwidth, so it’s time to head over to the Traffic Analysis module and figure out what’s happening.
The Traffic Analysis module is one of my favorite features of the EdgeRouter. The router is capable of in-depth inspection of all traffic flowing through it and does a very good job of categorizing traffic and reporting on it in a way I find very clear. To open the module click “Traffic Analysis” — the second tab in the top menu — and if you don’t see anything displayed make sure it’s enabled. Traffic Analysis is controlled with the three radio buttons in the top right, just under the menu bar.
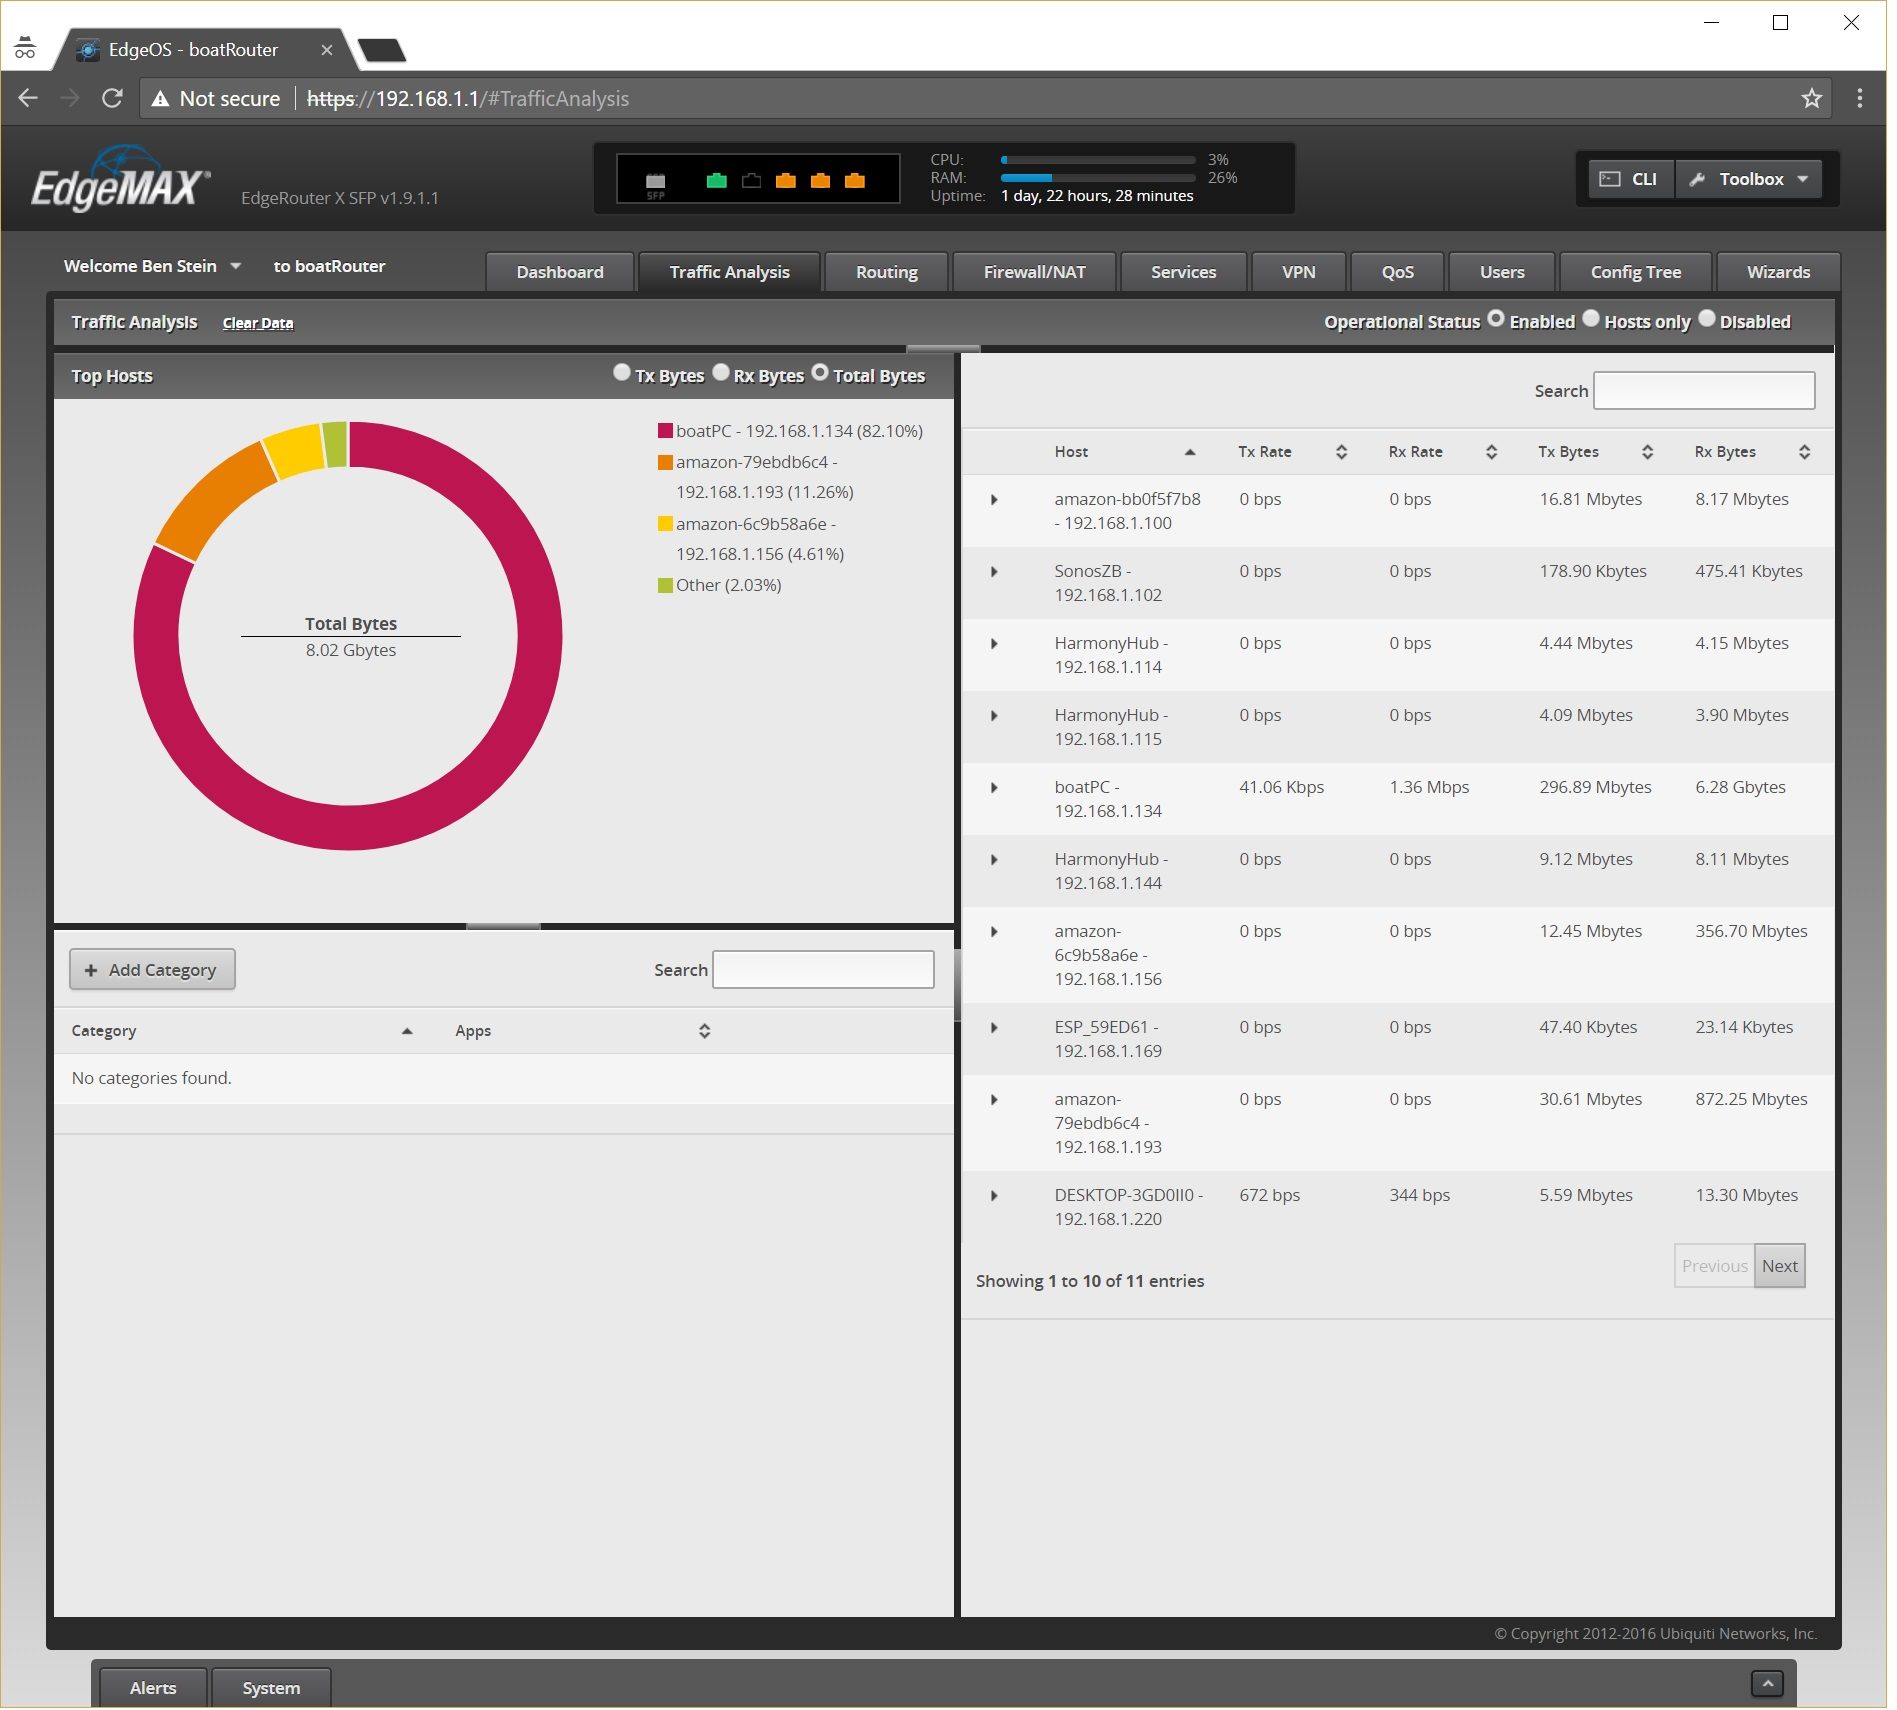
When I have troubles with all available bandwidth being used I typically head over to traffic analysis, then sort the list of hosts, which just means things connected to the network, by Rx Rate descending. You do this by clicking on the ‘Rx Rate’ column header until it shows a triangle with the point facing down. Now take a look at the top line or two and see if there’s a lot of bandwidth being consumed by anything in particular. It’s pretty likely you’ll find your smoking gun there, maybe a laptop or tablet was left streaming video?
If you have kids on board, you may well find that despite having been “told no more screen time,” they’re still binge-watching videos on YouTube. If you don’t find the source of the trouble, the next areas to check are the ‘Tx Rate’ column and then the ‘Rx Bytes’ and ‘Tx Bytes’ column. In the example above you can see that the device named boatPC, my Intel NUC based PC, has consumed 6.3 gigabytes, that’s a fair amount. In this case, it was because I was streaming a Cubs game while I wrote this article, If there wasn’t a clear explanation, I’d be off to figure out what’s running, sucking down so much bandwidth.

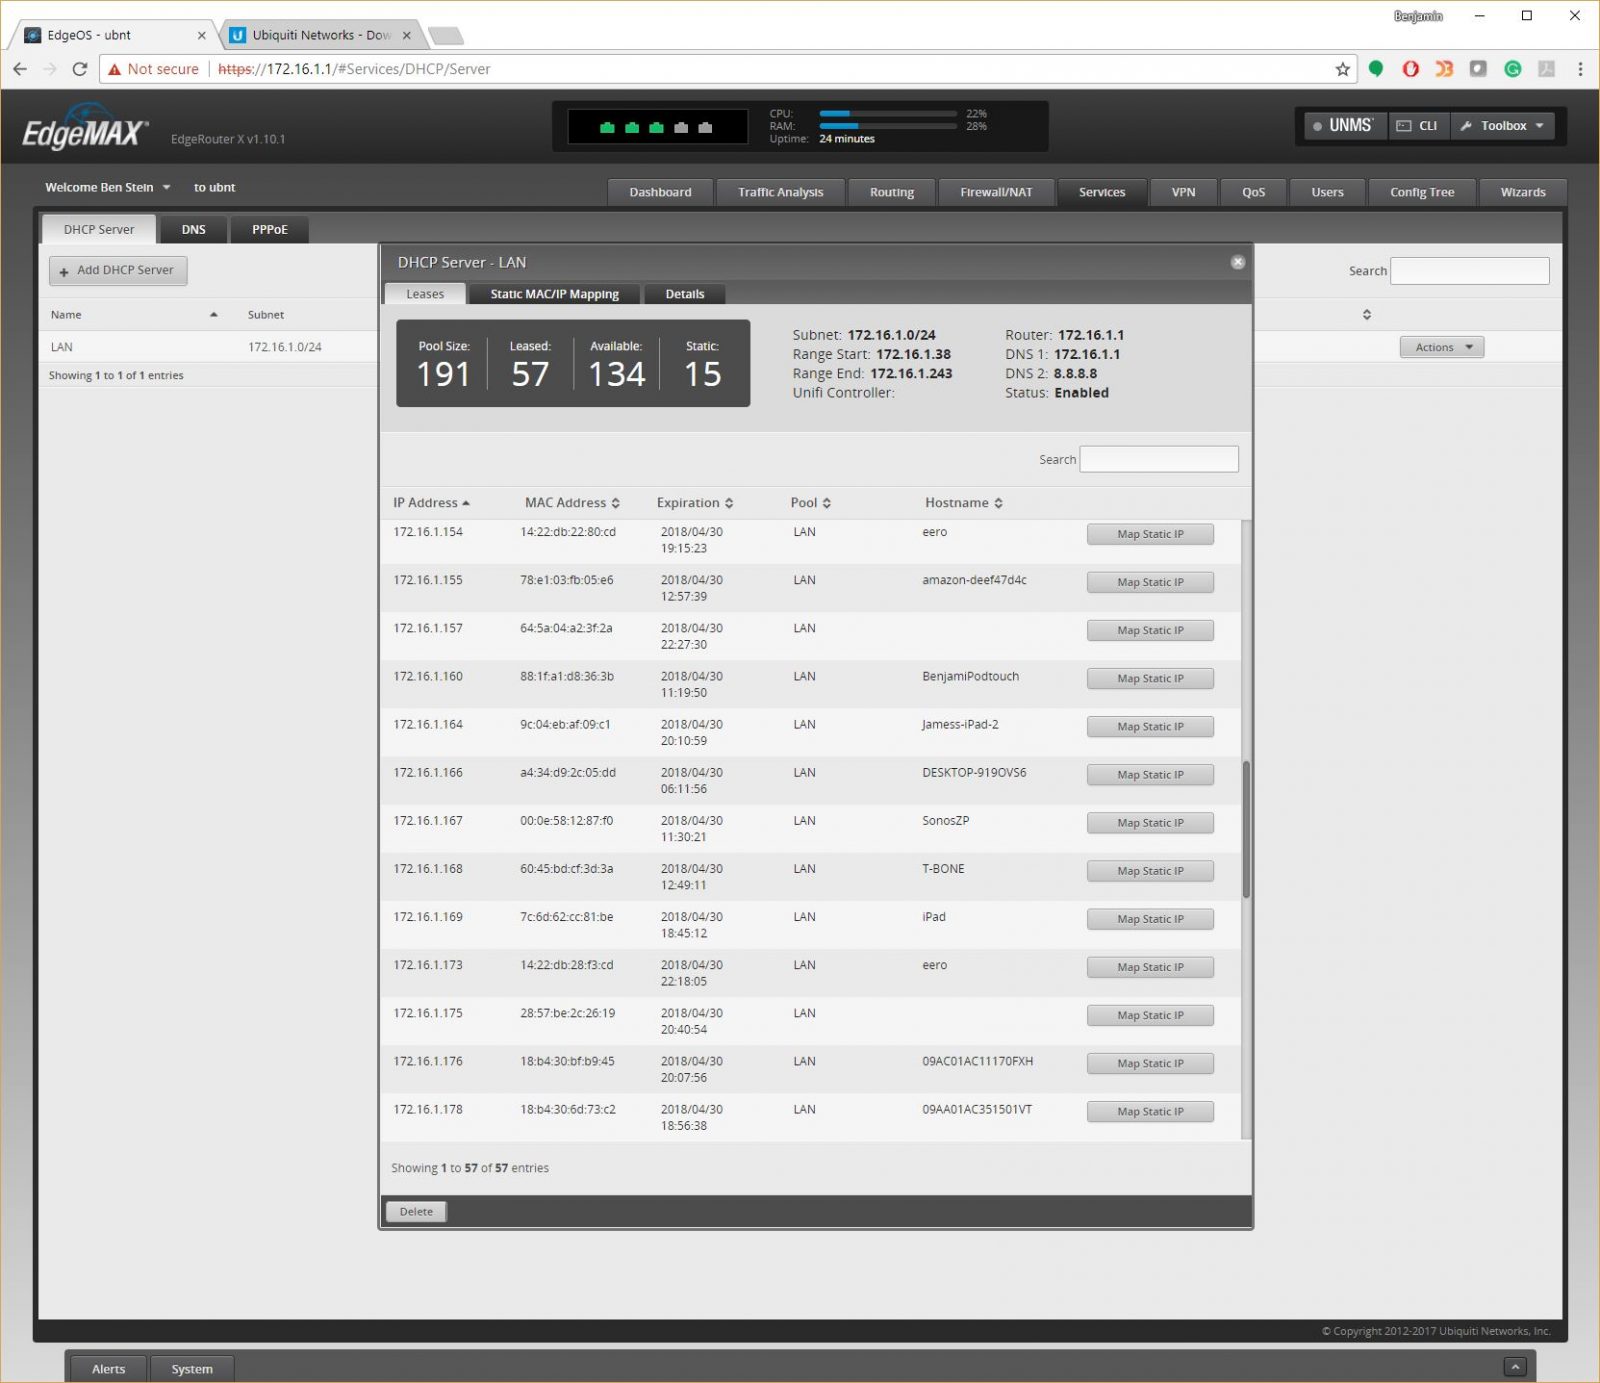
Another commonly performed task is checking out the DHCP lease list to find the address of a newly installed device on the network. DHCP stands for dynamic host control protocol, and it’s the protocol that is used to assign IP addresses to devices on the network. To find the IP of a device on the network, you scroll through the list and find the name of the newly added device in the list. Depending on how well the manufacturer of the new device has described it, this can sometimes be challenging. Most manufacturers will typically (hopefully) print the MAC Address (media access control address) on the bottom of the device. If the manufacturer has done it a little bit right, between the name and the MAC address you should be able to find the IP address of your newly installed device.
From this point you typically won’t have too much involvement with the EdgeRouter. The job of a router is to route traffic and if it’s doing its job well it’s likely you’ll just forget it’s there. Mine has been running smoothly for over two years. I’ve frequently gone months without having to do anything with mine. It just works.
Up next in the marine internet series I’ll have first looks at some of the equipment I’m currently evaluating. I’ll also show what is involved in configuring a Ubiquiti Bullet running the native Ubiquiti user interface. Also, if all of this is way more than you want to take on, don’t despair. Companies like Wave WiFi and Aigean Networks offer much simpler interfaces and options for professional installation.


Looks like a neat solution, Ben – it’s a pity it needs 24V DC. I just acquired a Netgear N600 dualband router/AP because it runs on 12V – of course it doesn’t have the built-in POE 🙁
Hartley, you make a great point. I was reminded of the utility of a buck-booster for problems like this. I just put an EdBlog on the subject: https://panbo.com/an-ode-to-buck-boost-dc-power-converters.
Ben
Finally aboard! Not underway yet, but I have my system up & running for Internet. Bullet (2GHz) connected to the marina here in Deltaville, to the Netgear router, with my computer connected via Ethernet and everything else via 5 GHz from the Netgear router — all running on boat 12VDC. I put in one of those little POE connections (normally marketed to folks with Ethernet cameras, I think) to power the Bullet and it works fine on 12V, as Ben E said a year ago (it ought to – it takes whatever comes in and regulates it down to 5V). The only failure was the little POE tester I had acquired, which wouldn’t light it’s LEDs unless it saw 24V [THAT wasted an hour or so while I checked pinout standards and voltmeter probed the Ethernet cable output].
Regarding the DC-DC converters, I am always leery of inexpensive switching power supplies, particularly step-up, because of their reputation for generating HF RFI. I have two HF-SSB radios aboard, so plenty of opportunity for trubbles. 🙂
Happy (belated) Fathers Day!
“…it turned out to be easier than I remembered.”
This was easier? Yikes!
It was, I realize the step-by-step view can make it a little daunting. The good news is this is the most involved configuration of any of the options out there. From here it only gets easier. At the expense of configurability and acquisition expense but it definitely gets easier.
Thanks Ben, for an in-depth step-by-step walkthrough for those who may not be network engineers. I’ve been testing Ubiquiti products recently and (like many of the network equipment manufacturers) they make it as compelling as they possibly can to use their proprietary configurations and protocols, which of course are not compatible with other manufacturers’ proprietary protocols. Your guide is well received, well done!
pictures are no longer loading
Thanks, Joe, but please try refreshing your browser. I’m seeing Panbo pictures fine even on a weak cell connection while underway.
Working fine here 🙂
Hi Ben, nice job on the write up.
I know you have a Bullet write up coming. In the mean time, can you share with me the network mode you use on your Bullets (bridge or router), as well as how you access the Bullets when they are connected to WAN ports (IP addresses, etc.)
I use the bullet in bridge mode. When the bullets are connected they maintain an internal IP on their default network. One thing to keep in mind is several devices on the network are doing network address translation (NAT). You want to make sure that each NAT device has its own network space for it’s NAT pool. So, on the boat the internal network is 192.168.1.0/24 (192.168.1.1-192.168.1.254) while the WAN side bridges are configured on 192.168.30.0/24, 192.168.31.0/24 etc.
I’ve had good luck with the Ubiquiti Edge Lite 3 Router. Handles two WAN connections, has the set-up wizard, and operates on 12VDC. Four systems installed and no issues.
Also, look at Tycon’s POE supplies, able to convert DC input voltage to a different POE output voltage. Another reliable product.
Hi Ben,
I’d love to see a diagram of your configuration, AP, and such. I’m particularly interested in the AP and the cellular connectivity.
Do you have anything you could share?
Thanks,
Sam